When electrical issues arise in a home, prompt attention is necessary to ensure safety and functionality. Common problems like flickering lights, tripped circuit breakers, and non-responsive outlets are often due to overloaded circuits, faulty wiring, or switch malfunctions. Homeowners should start with a visual inspection of their electrical system, including familiarizing themselves with the layout and reading their electrical panel. Handyman Tips emphasize looking for visible signs of wear or damage in wires and connections, and suggest practical solutions such as managing appliance usage to prevent circuit overloads. For issues like repeatedly tripped breakers or flickering lights, simple fixes might include replacing light bulbs or addressing wiring concerns. However, all electrical troubleshooting should be approached with caution due to the risks involved. When in doubt or facing complex problems, it's essential to call a licensed electrician for professional help. By following Handyman Tips and using tools like multimeters to check for continuity, homeowners can safely diagnose and address many electrical issues, ensuring their homes remain safe and functional. Always remember to observe local electrical codes and regulations throughout the process, and never hesitate to consult a professional if needed.
When a light flickers or an outlet stops working, understanding basic electrical troubleshooting can save the day. This article equips homeowners and handymen with essential knowledge to navigate common electrical issues safely and effectively. We’ll explore typical problems in residential settings, outline steps for circuit troubleshooting, demonstrate the use of multimeters and voltage testers, and offer repair techniques along with best practices to ensure your electrical fixes are both lasting and safe. With these handyman tips, you’ll be well-armed to handle a range of electrical challenges confidently.
- Identifying Common Electrical Problems in Residential Settings
- Steps for Safe and Effective Circuit Troubleshooting
- Utilizing Multimeters and Voltage Testers to Diagnose Issues
- Repair Techniques and Best Practices for Electrical Handymen
Identifying Common Electrical Problems in Residential Settings

When electrical issues arise in residential settings, prompt identification and resolution are key to ensuring safety and functionality. Common electrical problems can range from flickering lights to tripped circuit breakers or non-responsive outlets. A seasoned handyman will tell you that these troubles often stem from overloaded circuits, faulty wiring, or even simple switch malfunctions. To address such issues effectively, one must first familiarize themselves with the layout of the home’s electrical system, understanding where breakers are located and how to read an electrical panel. Handyman tips suggest starting with a visual inspection of visible wires and connections for any signs of wear or damage. For instance, if a circuit breaker repeatedly trips, it may indicate an overloaded circuit that can be alleviated by unplugging unnecessary appliances or rearranging power usage throughout the day. Similarly, dimming or flickering lights might signal a problem with the circuit, wiring, or even a bulb that’s on its last legs. In such cases, replacing the bulb or addressing the wiring could prevent more severe issues from arising. It’s important to approach these troubleshooting steps with caution, as tampering with electrical systems can be hazardous if not done correctly. Therefore, when in doubt, consulting a licensed electrician is always the safest course of action. With these handyman tips, homeowners can confidently identify and begin to resolve common electrical problems, ensuring that their homes remain both comfortable and secure.
Steps for Safe and Effective Circuit Troubleshooting

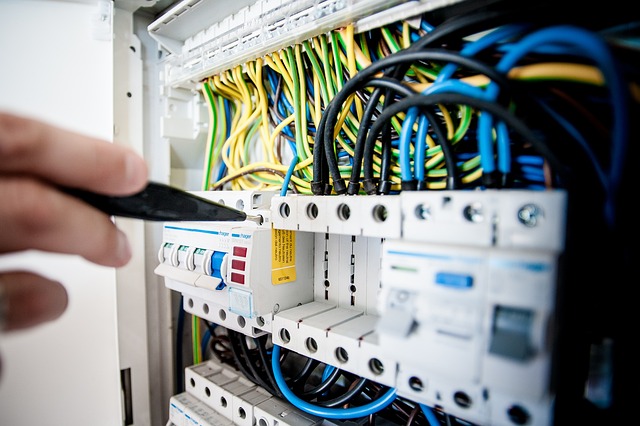
When encountering issues within an electrical circuit, safety is paramount. Before attempting any troubleshooting, ensure that the circuit breaker is off or that the fuse has been removed to eliminate the risk of electric shock. Handyman Tips advise starting with a visual inspection of the circuit for visible signs of wear or damage, such as frayed wires, corroded connections, or loose terminals. Utilize a multimeter to verify continuity and check for any breaks in the circuit. This step is crucial to avoid unnecessary disassembly or component replacement.
Once you’ve confirmed the presence of a fault using the multimeter, proceed with caution. If a component or wire appears to be malfunctioning, replace it rather than repairing it. This approach adheres to Handyman Tips and helps prevent potential future failures. After replacing components, re-energize the circuit by restoring the power supply, still with the breaker off or the fuse out, and use the multimeter again to verify that there are no electrical shorts or continuity issues. Only once you’ve confirmed that all repairs have been made correctly should you turn on the circuit breaker to restore power. Throughout this process, always follow local electrical codes and regulations, and if in doubt, consult a licensed electrician for assistance.
Utilizing Multimeters and Voltage Testers to Diagnose Issues

When encountering electrical issues within your home or workspace, having the right tools on hand is crucial for accurate diagnosis and prompt resolution. Among these essential tools are multimeters and voltage testers, indispensable devices for any handyman looking to troubleshoot common electrical problems with precision. A multimeter is a versatile tool that measures electric current, voltage, and resistance. It’s an all-in-one device that can save time and effort by eliminating the need to carry multiple instruments. To use a multimeter, first, set it to the correct function; for instance, if you’re checking voltage, ensure the dial is on the voltage (V) setting. Then, connect the red probe to the positive terminal and the black probe to the negative terminal of the circuit or component you wish to test. The display will show the voltage level present.
Voltage testers, also known as neon or non-contact testers, are simple yet effective tools for detecting the presence of voltage in conductors without making physical contact. They’re particularly useful when verifying live wires before handling or when checking for electrical faults within walls or devices. To use a voltage tester, simply hold it close to the conductor you suspect is live. If the device illuminates or beeps, voltage is present, signaling that there is an active electric current flowing through the conductor. Both tools are invaluable for any handyman and should be part of your troubleshooting kit to safely and effectively diagnose and address a wide range of electrical issues. With these devices, you can confidently navigate common problems such as circuit breaker trips, flickering lights, or outlets that fail to provide power, ensuring that each fix is carried out with the utmost safety and accuracy.
Repair Techniques and Best Practices for Electrical Handymen

When addressing common electrical issues, handymen employ a variety of effective repair techniques that combine both practical experience and technical knowledge. A foundational understanding of electrical circuits, voltage, current, and resistance is crucial for safely troubleshooting and repairing malfunctions. Handymen must adhere to safety protocols, including the use of appropriate personal protective equipment like insulated gloves and safety glasses. They should always verify that the power is off at the circuit breaker or fuse box before attempting any repairs to avoid the risk of electric shock.
Effective troubleshooting often begins with a visual inspection of the electrical system, followed by an assessment using a multimeter to measure voltage, current, and resistance. This diagnostic approach helps pinpoint the exact location and nature of the problem. For issues like flickering lights or dead outlets, handymen should inspect fuses, circuit breakers, and wiring for signs of wear, overheating, or damage. Common fixes include replacing faulty switches, light bulbs, or loose connections. Handyman tips emphasize the importance of keeping a well-stocked toolkit with essential items like wire strippers, pliers, screwdrivers, and voltage detectors to facilitate prompt and efficient repairs. Best practices also include thorough testing after repairs are made to confirm that electrical flow is restored without compromising safety or functionality. Handymen should document their findings and repair processes for future reference and to ensure compliance with local electrical codes and standards.
Homeowners and handymen alike can now confidently address common electrical issues thanks to the troubleshooting basics outlined in this article. By recognizing frequent electrical problems within residential settings, one can take proactive steps to ensure safe and effective circuit troubleshooting. With guidance on using multimeters and voltage testers, individuals are well-equipped to accurately diagnose malfunctions. The repair techniques and best practices provided serve as a valuable resource for those looking to enhance their handyman skills. Understanding these principles not only aids in resolving current electrical hiccups but also in preventing future complications. Handymen can now approach electrical repairs with greater assurance, ensuring safety and efficiency in every fix.