
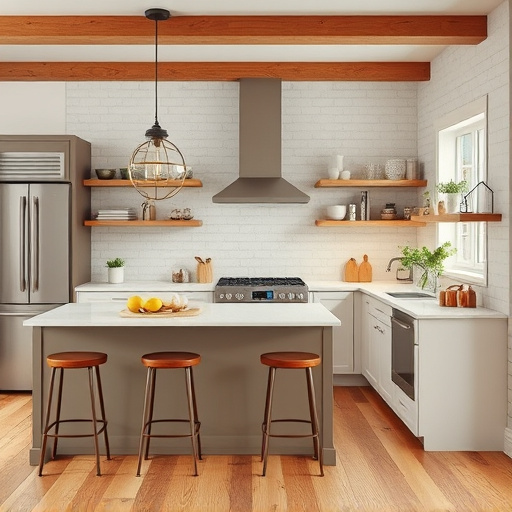
Choosing flooring for kitchen renovations impacts both design and practicality. Consider options like ceramic tiles, hardwood, LVP, or stone, evaluating durability, maintenance, and budget. Planning involves assessing floor condition, measuring, setting a budget, researching, and preparing the space. Preparation includes clearing furniture, repairing the subfloor, cleaning, and masking. Installation requires clearing the space, measuring, laying flooring with a level, and using adhesive. Select flooring that matches your lifestyle and design, considering durability, water resistance, and maintenance for high-traffic areas. Proper care involves regular cleaning, quick spill response, and periodic resealing/refinishing to extend floor life during kitchen renovations.
Revamp your kitchen’s look with a fresh floor installation—a key aspect of any successful kitchen renovations. This guide navigates your project from start to finish, offering insights into understanding various flooring options tailored for kitchen makeovers, planning your install, and preparing the space. We provide a detailed step-by-step process, expert tips on selecting the ideal flooring material, and essential post-installation care advice. Transform your kitchen with confidence using these practical strategies for a stunning, lasting result.
- Understanding Kitchen Flooring Options for Renovations
- Planning Your Kitchen Floor Installation Project
- Preparing the Kitchen Area Before Installation
- Step-by-Step Guide to Installing New Flooring
- Tips for Choosing the Right Flooring Material
- Post-Installation Care and Maintenance Tips
Understanding Kitchen Flooring Options for Renovations

When it comes to kitchen renovations, choosing the right flooring is a key decision that can significantly impact the overall aesthetic and functionality of your space. There are numerous options available, each with unique characteristics and benefits, allowing you to transform your kitchen into a modern, stylish, or rustic oasis. From timeless classics like ceramic tiles and hardwood to contemporary favorites such as luxury vinyl plank (LVP) and stone, the possibilities are endless.
Consideration should be given to factors like durability, maintenance requirements, and budget. For instance, LVP is highly durable, water-resistant, and easy to maintain, making it a popular choice for kitchens. On the other hand, hardwood adds natural warmth and can increase the value of your property but demands regular care to preserve its beauty. Understanding these options will empower you to make an informed decision that aligns with both your design vision and practical needs during kitchen renovations.
Planning Your Kitchen Floor Installation Project

Before starting your kitchen renovations, careful planning is essential for a successful flooring installation project. Begin by assessing the current state of your kitchen floor, considering factors like structural integrity, existing materials, and any necessary repairs or preparations. Measure the space thoroughly to determine the quantity and type of flooring required, ensuring you account for cuts, corners, and potential waste. Create a budget that aligns with your project goals, taking into account material costs, labor fees, and any additional expenses for tools or specialized services.
Researching different flooring options is crucial, considering factors like durability, style, maintenance requirements, and cost-effectiveness. Explore trends in kitchen flooring to enhance aesthetics while keeping functionality in mind. Prepare your space by clearing it of furniture and appliances, and protect adjacent areas from potential debris and damage. Gather the necessary tools and materials, or consider hiring a professional team for a seamless and efficient flooring installation process during your kitchen renovations.
Preparing the Kitchen Area Before Installation

Before starting any flooring installation, preparing your kitchen area is a crucial step in ensuring a smooth and successful renovation. Begin by clearing all furniture, appliances, and accessories from the floor space. This includes countertops, cabinets, and any other structures that are not part of the new flooring design. Once the area is cleared, inspect the existing subfloor to identify any damages or irregularities. Repair or replace damaged sections to create a level surface, as an uneven base can compromise the final look and durability of your new flooring.
Additionally, take time to clean and prepare the walls and trim around the kitchen. Remove old caulk and paint or prime any exposed surfaces to ensure a seamless integration between the floor and surrounding areas. Mask off nearby surfaces and appliances that might be affected by dust or debris during the installation process. Proper preparation will not only make the flooring installation easier but also contribute to the longevity of your kitchen’s new look.
Step-by-Step Guide to Installing New Flooring
Installing new flooring is an excellent way to refresh your kitchen and bring a modern look to this heart of your home. Here’s a step-by-step guide to help you through the process, ensuring a successful DIY kitchen renovation.
1. Preparation: Begin by clearing the space, removing all furniture and appliances. Protect nearby walls and floors with drop cloths or plastic sheeting. Measure the room accurately to determine the amount of flooring material needed. Gather all the necessary tools: a measuring tape, utility knife, floor roller, and any flooring adhesives or sealants recommended for your chosen material.
2. Laying the Foundation: If you’re installing over existing flooring, ensure it’s clean, dry, and free from debris. For new construction, prepare the subfloor by sweeping and ensuring it’s level. Start laying your flooring from one corner, using a level to ensure each row is straight and aligned. Apply adhesive as per manufacturer instructions, typically in a grid pattern. Press the flooring into place, using a floor roller to remove any air bubbles and ensure a tight fit.
Tips for Choosing the Right Flooring Material

When embarking on kitchen renovations, selecting the perfect flooring material is a significant decision that can greatly impact both the functionality and aesthetics of your space. The right floor can transform your kitchen into a vibrant hub, enhancing its overall look and feel. Consider these tips to choose wisely:
First and foremost, evaluate your lifestyle and usage patterns. High-traffic areas in the kitchen, like near the sink or stove, may require durable materials that can withstand constant use and potential spills. Think about water resistance and easy maintenance if you have kids or pets. Additionally, the style of flooring should complement your kitchen’s design—whether modern, rustic, or contemporary—to create a cohesive and inviting atmosphere. From classic hardwood to trendy tiles, numerous options are available, each offering unique benefits and visual appeals.
Post-Installation Care and Maintenance Tips

After your new flooring is installed, proper care and maintenance will ensure its longevity and keep your kitchen looking its best for years to come. Start by sweeping or vacuuming regularly to remove any dirt or debris that may accumulate on the surface. Avoid using harsh chemicals or abrasive cleaners, as these can damage the finish and compromise the integrity of the flooring. Instead, opt for mild cleaning solutions specifically designed for your type of flooring.
For kitchen floors, staying on top of spills is crucial. Promptly wipe up any liquid to prevent staining. Consider using mats at entryways to trap dirt and moisture before it reaches your floor. Periodically, re-seal or refinish the flooring as recommended by the manufacturer to maintain its protective coat and enhance its durability against everyday wear and tear, especially in high-traffic areas like kitchens, which are a focal point for Kitchen Renovations.
Revamping your kitchen through flooring installation is a powerful way to enhance its aesthetics and functionality during kitchen renovations. By carefully considering material options, planning each step of the project, and maintaining proper care post-installation, you can achieve a stunning and durable floor that serves as the centerpiece of your culinary space.